Prepare the delivery before choosing a tool
Write down which artboards are required, the delivery formats, raster dimensions or scale, background behavior and destination folder. Rename artboards so they identify the content. Save the source .ai document and check linked files and fonts before export. One correct sample is more useful than a large queue of unchecked files.
Do not assume a preview proves print suitability. PDF settings, raster transparency and SVG appearance have different verification needs.
Export one or a selection with Export for Screens
Adobe Illustrator’s native path is File > Export > Export for Screens. On the Artboards tab:
- Open the document and choose File > Export > Export for Screens.
- Select All or enter a Range of artboard numbers. Adobe supports comma-separated lists and hyphen ranges, for example
1,2,4-6. - Use Add Scale (or the equivalent control in your version) to add one or more output formats and scales. Supported common formats include PDF, PNG, JPEG and SVG—confirm the exact list in your installed Illustrator.
- Choose the export location and export. Selected artboards are written as individual files for each active format/scale.
Export for Screens does not mean “merge every artboard into one PDF” unless you deliberately choose a workflow that creates a single multi-page PDF elsewhere. Inspect the actual files. For a single artboard you can also use File > Export > Export As with Use Artboards and that artboard’s number as the range.
Before adding another tool, identify remaining friction: repeated preset configuration, naming across variants, collision policy or a controlled queue with failed-item recovery.
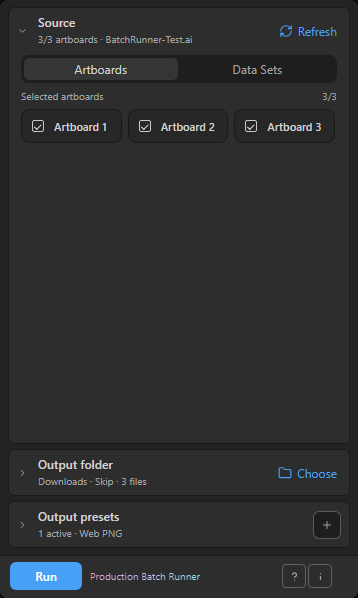
Build the queue in Production Batch Runner
- Save the current .ai document and open Production Batch Runner.
- In Source, choose Artboards, refresh the source when needed and select only the required artboards.
- Choose a local output folder. Use a fresh sample folder for the first validation.
- Create output presets for the required formats: PDF, PNG24, JPEG or SVG. Review each preset’s suffix, subfolder and format-specific options.
- Set the filename parts and an existing-file policy, then inspect the filename preview.
- Run a small selection and inspect its actual output files before expanding the batch.
A preset is one configured output, not a separate source document. In a hypothetical example, three artboards and two active output presets create six planned outputs. This arithmetic is a planning example, not a measured export result.
Check the result rather than just the count
- Open representative files from every format, not only the first PNG.
- Check artboard coverage, dimensions, background/transparency and visible text.
- Check file names, destination subfolders and the selected collision behavior.
- Review failed and skipped items separately. An existing file skipped intentionally is different from an export failure.
Cancellation takes effect after the current output. Review the completed portion before retrying. Retry only the failed items once their cause is understood.
Artboards and Data Sets are different sources
Artboards identify regions of a document. Data Sets identify existing variable-data states in Adobe Illustrator. Batch Runner can queue either supported source, but it does not import a CSV or create variables for you. Prepare data sets separately and inspect their artwork before exporting. The panel currently operates on the saved active .ai document; do not present it as a folder-of-documents processor.
The panel for this task
Batch-export selected Adobe Illustrator artboards or data sets to PDF, PNG24, JPEG and SVG with output presets, filename preview and retry. Listed at $19 USD.
Explore Production Batch RunnerSources and scope
This guide combines the publisher’s product source and documented workflow with the official references below where applicable. Interface screenshots show setup, not a newly verified host result. Inspect your actual output before production delivery.